

Setting up the Zoom F3 recorder
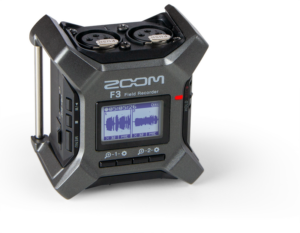 The Zoom F3 has become an attractive recorder options for wildlife recordists in recent years, with a combination of small size, light weight, reasonable battery life, 32-bit recording, and overall high quality sound files. Its setup and use is overall quite intuitive, but in order to best facilitate sound recordists, we have assembled this setup document to streamline the process. As always, for a more in-depth list of settings and options, the Zoom F3 user manual can be consulted.
Channel setup
If you are recording with a single microphone, like many wildlife recordists using shotgun microphones or parabolas, it just takes a few simple steps to make sure you’re not wasting memory by including extra channels.
- Make sure you plug the microphone into the XLR channel labeled 1 (notably, this is on the right as you look directly at the XLRs, unlike on most other recorders, probably because it is on the top of the recorder and corresponds to the left channel on the screen.)
- Go to MENU, Recording, File Format, and set to Mono.
- Deactivate the right (2) channel by pressing the Input 2 menu (the gear icon all the way on the right) and choosing On/Off, Off.
- If you are using a microphone that requires phantom power (powering by the recorder through the XLR cable), or if you simply choose to power the microphone that way, you can turn it on by selecting the Input 1 menu (left gear icon), Source, Mic (+48V).
- If desired, a light high pass filter can be applied from the input menu. 50Hz or less is recommended, and none is required.
Recording settings
Sample rate: Go to MENU, Recording, Sample Rate and choose desired sample rate. Many users choose 48kHz as an option that captures sufficiently high frequencies for most bird vocalizations.
Bit depth: The F3 records 32 bits automatically and cannot be changed.
Pre Rec: This setting involves the recorder saving a buffer segment of audio constantly so that when you press record, you automatically have a few extra seconds (6 when using 48kHz) saved before that point. It can be useful in case you miss the beginning of a song, although note that you will most often just have a few seconds of walking or handling noise at the beginning of each file. That’s easy to trim off when you edit the file, though, so it’s usually worth having on. Go to MENU, Recording, Pre Rec, On (6 sec).
Headphone alert: By default, the recorder plays a brief tone over the headphones to let you know that you are recording (single beep) or have stopped recording (lower double beep). This can be very useful to make sure you have actually started a recording (although note that it can show up in the recording itself if you volume is high enough). You can change the volume or turn it off entirely under MENU, Output, HP Alert Vol, and adjust the volume up or down.
Date and Time: Date and time can be set by going to MENU, System, Date/Time. This may also affect the file name (see below), so be sure to set it accurately and change it when moving between time zones.
Recording
Pull the Record switch up and then release to start a recording. To end a recording, repeat the motion, or press the square stop button.
Hold: The hold switch is designed to prevent accidental button pressing, but mostly gets in the way. If you try to turn the recorder on but nothing happens, make sure the switch isn’t set to Hold. Theoretically you could engage hold while recording too, to prevent accidentally stopping the recording, but in practice, this is unlikely to prove useful in the field.
File naming
Files can be named with the date (e.g. 240315_001_Tr1.WAV) or with a user-defined prefix (e.g. JCB_001_Tr1.WAV). This is up to the recordists, but date naming is usually a helpful setting to maintain, provided that the user also maintains an accurate date and time on the unit. This can be changed under MENU, Recording, Rec File Name.
The “_Tr1” suffix is included by default for mono files, with no obvious way to opt out. It can be ignored or removed with a batch renamer after download if desired.
Waveform zoom, metering, and headphone volume
Because the F3 records at 32 bits and distortion or clipping at the recorder is impossible, it does not require or offer a gain control. Files are recorded at a set level, and any changes to amplitude are done in post processing after download. Overall, this is great, as it removes the need to teach or learn level setting, traditionally one of the most time consuming and subjective aspects of field recording. However, two potential downsides exist.
One downside is that the F3 does not offer a traditional level meter, only an amplitude waveform that can be zoomed in or out on to assess signal-to-noise on the recording. This works reasonably well, but doesn’t give you the precision that a traditional level meter would. Notably, zooming in and out on the waveform during recording does not change the amplitude of the resulting file, but does change the volume of the output in headphones. Headphone volume can also be changed using the -/+ buttons next to the headphone jack, so you can use the two options to achieve the desired output level.
A second downside is that for playing back recordings in the field, the output level can be quite low compared to an older recorder where input level could be controlled. This means that it can be challenging to record a bird and play back to it off this device.
Portability setup
The F3 is small and portable, but finding a good way to mount it to maintain visibility of the screen and recording light as well as accessibility to the record and stop buttons can be a bit of a challenge. The main ways we have found work well are:
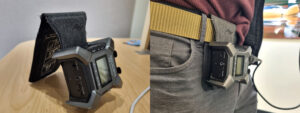
- Mounting directly on a belt through the side bars is the simplest option, and can work well. Downsides are changing batteries requires the belt to be remove, and it can be hard to see the screen at time.
- Using a third party mounting accessory, such as the Peak Design ProPad, the recorder can be mounted on a belt or pocket in such a way that all the necessary buttons are easily accessible and the unit can be easily tilted up to see the screen and buttons. An additional clamp or clip may be needed eventually at the tip of the pad to prevent the recorder from sliding off as the pad becomes worn over time.
- Using the bars on the back to clip onto or attach lanyards, the recorder can be mounted on a strap or band across the shoulder or chest. This method also allows for potentially strapping a small lithium battery to the recorder as well, reducing the need for an additional loose cable if using an external battery (see below).
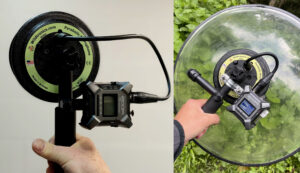
- Mounting the recorder directly onto the microphone, especially helpful with a parabola, using the tripod mounting threads on the back. This can be accomplished by a variety of custom made adaptors, or using the Mini Accessory Bar Kit if using a Wildtronics parabola.
Between the tripod mounting threads and the bars, there are lots of ways that this recorder could be mounted or carried, so if these options don’t appeal to you, you can probably find another good way!
Battery setup
While the F3 lasts a reasonably long time on its two AA batteries (perhaps 2-4 hours, roughly, depending on battery type), attaching an external lithium rechargeable battery pack can drastically reduce the need to worry about power options. Something like this Anker battery can be plugged in via the USB-C port next to the SD card slot with a USB-C-C or A-C cable and will power the unit for upwards of 8 hours. Depending on how you are carrying or mounting the unit, this may or may not be an inconvenience, but it has worked well for many of us when we are not in the mood to deal with switching out AAs partway through a morning in the field. Carrying an extra set or two of AAs or a second lithium battery is always recommended practice anyway, since battery life (and even cable viability) can be unpredictable.
Memory and download
The F3 takes a microSD card in a dedicated slot. 32GB works well and is typically plenty of capacity. One important limitation to know is that this recorder has a 500 file limit to its internal index, which effectively means that it can only store 500 files at a time on the SD card, even if the card capacity is much higher. Therefore, it is imperative that recordists consider this and move files off the card regularly to avoid hitting this hard limit in the field. For productive field recordists, this may only be a few days of recording, and may be a reason to bring along multiple smaller (16 or 32GB) SD cards rather than investing in one very large card. The 500 file limit will be hit long before the 32GB capacity in most cases.
Downloading files can be achieved either by removing the microSD card and using a card reader or SD card adapter, or using a USB-C cable. To download via cable, plug the unit into the computer via USB-C cable, power it on (this should work even without batteries as it should be powered via the computer at this point), then press MENU, USB File Transfer, then ENTER. If the cable and connection are working, this should initiate the connection and show up as a device on your computer quickly. From there, you will need to navigate the files as you would any other external device, opening the device folder in Finder or File Explorer and copying or moving the files to your computer or external hard drive.
It is always recommended with modern removable media to copy to one one location, then move the files to a second location to maintain a backup and reduce the need to delete files (risking accidentally deleting un-backed-up files) or reformatting cards (same risk).