Setting up recording apps for Android devices
Updated October 2018 – settings for RecForge II and Hi-Res Audio Recorder
RecForge II
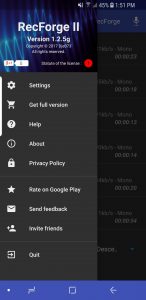
RecForge II is a recording app for Android mobile devices. We like this app because it can record uncompressed WAV files up to 48kHz at 16 bits. It displays a waveform showing amplitude during and after recording, which is helpful in determining unwanted handling or background noise. It also allows you to adjust the record level before recording, and transferring the recordings to your computer is easy using the share function. A paid version is available, but the free version contains all of the most important functions.

Settings
On the Settings menu, make sure Audio Settings is set to WAV, 48kHz. choose Disable AGC to prevent the app from automatically adjusting the record level during the recording. On Other Settings, you can prevent phone from sleeping if desire, but be sure to uncheck conversion auto. Auto switch to wave view is useful and should be turned on. Preview mode could be useful to adjusting gain before recording, but it can also be confusing and might be best to leave it unchecked. Other settings can be changed according to preference.
Recording tips
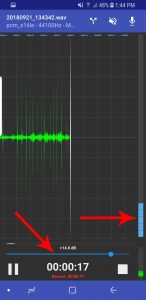
Note the blue level meter on the right side of the record screen, as well as the amplitude of the sound on the waveform (green). If these are too close to top of the screen, the recording level is too high and should be reduced using the slider at the bottom on your next recording, simply slide the blue dot to the left.
File transfer
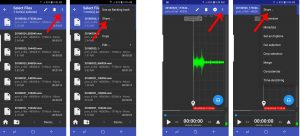
Transferring audio files recorded with RecForge II to your computer for editing and upload is easy using the share function. Open the menu bar (3 dots on the upper right), select share and then select the file you want to share. This will open the sharing options available on your phone, such as save to Dropbox or email.
Hi-Res Audio Recorder
Hi-Res Audio Recorder is another recording app for Android devices. It also records uncompressed WAV files and offers the higher sample rate and bit depth options that we recommend. We like this app because once the settings have been configured it is simple to use, however it doesn’t offer as many sounds visualizations as RecForge II.
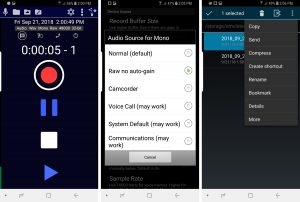
Settings: First, touch the settings wheel (upper right). Touch compression, select file format, and select WAV. Second, under the setting wheel touch record settings, touch Audio Source for Mono and select Raw no auto gain. Third check that Auto Sample Rate is on and set to 48000 Hz. Finally check the option for 32-bit Audio.
File transfer: To transfer the files to your computer for edit and upload, touch the upper right share icon and select the sharing options available on your phone, such as save to Dropbox or email.
Tips: Note the thin, green level meter on the far left edge of the screen (left screenshot). It can be hard to see but gives you an idea of the loudness of incoming sounds.