

WavePad tutorial
WavePad is a free program (paid premium version also available) that works well for editing audio recordings for submission to the Macaulay Library. Continue on for a step-by-step demonstration of how to edit recordings for upload.
WavePad is a destructive editing program, which means that if you edit a file and then use the “Save” function, the file will be permanently altered to reflect the changes that you made. To deal with this issue, the Macaulay Library recommends keeping two copies of your original sound files (one on your computer and another on an external hard drive), and then making edits to a third copy. With this approach, using the “Save” function will just make changes to a file that you have specifically designated for editing purposes.
Editing a single sound file
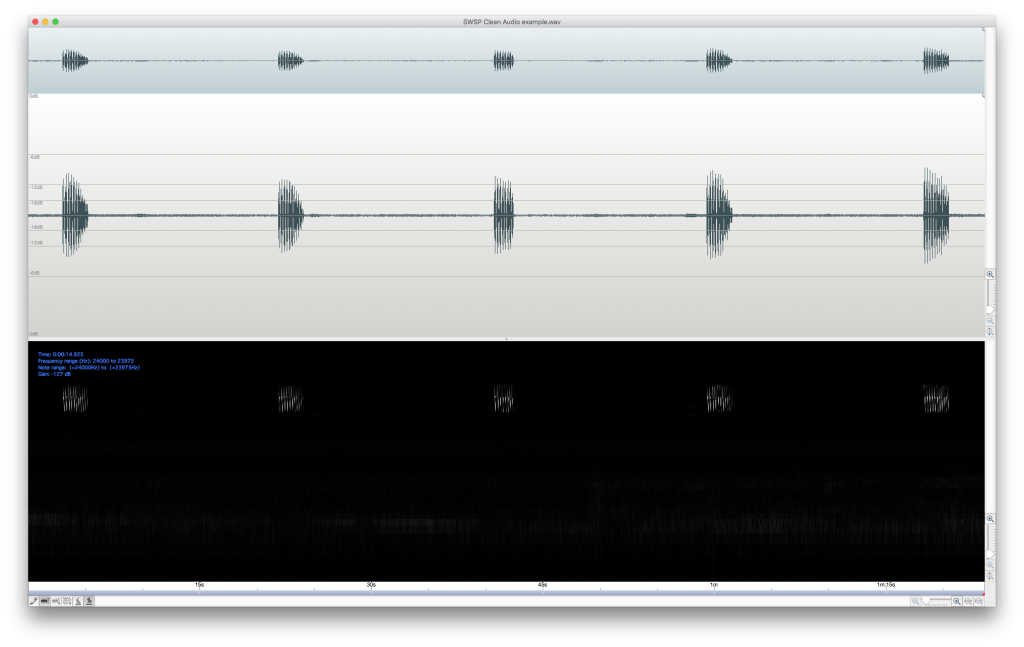
If you have a single sound recording that you’d like to upload to an eBird checklist, it can be prepared in just a few easy steps. Below is a single sound file, without any pauses, with five songs from a Swamp Sparrow:

The first step is to listen to the recording, find where the first sound from the target species occurs, and then highlight the three seconds immediately before that sound:

Looking at the waveform of this recording, we see that the three seconds that are highlighted are “clean audio,” with no recordist noise or prominent, potentially confusing background species. In a case like this, you should include this three-second buffer of ambient sound in the final sound file that you upload to eBird. But if there is any additional audio before the buffer, go ahead and delete it. In our Swamp Sparrow recording, there are about eight seconds of additional audio that we will delete:

After trimming the beginning of your recording, go ahead and do the same thing at the end of your recording—look for the last sound from your target species, include a three-second buffer of ambient sound after that sound, and then trim any additional audio after the buffer.
In some cases, it is not possible to create a clean three-second buffer immediately before the first target sound. In the sound file below, the target species, Prothonotary Warbler, begins singing near the 5-second mark:

However, there is some loud handling noise created by the recordist shifting the parabola shortly before the Prothonotary Warbler song:

If we included a three-second buffer in this case, the loud handling noise would create problems with setting the level of the recording. So, we will instead create a shorter buffer that ends immediately after the handling noise, creating a clean one-second buffer before the first Prothonotary Warbler song:

Loud background species can also overwhelm the target species at the beginning of a recording. If this is the case, you can trim the audio in the same manner as shown above.
Returning to our Swamp Sparrow example, we now have a sound file that looks like this:
After trimming the ends of the sound file, the next step is to normalize the recording so that the loudest sound from your target species reaches a level of -3 dB. By setting the peak level of your recording to -3 dB, you’ll be creating a sound file that is consistent with the thousands of sound files archived in the same way at the Macaulay Library. This is simple to do in WavePad, which has a “Normalize” command in the Effects menu. When the dialog window opens, slide the green bar until it reads “-3dB” or select “Simple Peak, 3dB headroom” from the Preset menu. After normalizing the sound file to -3 dB, our Swamp Sparrow recording looks like this:

The final step is to save the changes that you have made to your sound file. Before pressing “Save,” though, make sure that you have backup copies of your original, unedited sound file.
There are two other things to think about when you reach the point of saving your newly edited file: the name and audio properties of the file. Naming the file with the bird’s common name or scientific name can be helpful in identifying it as an edited file intended for upload (versus an original field recording), but ultimately, use whatever system works best for you. For the audio properties of your sound file, the best and easiest thing to do is to save your edited file with the same format, sample type, and format settings as your original field recording. WavePad will default to using the original file format when performing a “Save As…” The eBird upload tool can handle sound files up to 250 MB in size, so if you’ve recorded a .WAV file in the field, please upload an edited .WAV to your eBird checklist!
Multiple recordings of the same individual bird
If you made two or more field recordings of the same individual bird in the same location and at the same time, you should group these recordings together and create a single multi-part sound file for upload. Below is an example of two Louisiana Waterthrush recordings of the same individual, made in rapid succession:


Before grouping these two recordings together, the first step is to edit each individual segment following the guidelines in the “Editing a Single Sound File” instructions above. First trim and normalize the first sound file:

Then perform the same actions on the second segment (and any additional segments):

Because these two files are both recordings of the same individual Louisiana Waterthrush, they should be grouped together in a single file. To do this, add one second of silence to the end of “Louisiana Waterthrush 1” by placing the cursor at the end of that file, going to Edit ⟶ Insert Silence ⟶ End. The program defaults to one second, so you can simply hit enter and silence will be inserted at the end of the segment. If you wish to manually insert silence, place the cursor at the location you want the silence, and go to Edit ⟶ Insert Silence ⟶ Current.
Next, return to the second sound file, in our case “Louisiana Waterthrush 2,” Select All, and Copy. Returning to the “Louisiana Waterthrush 1” file, place the cursor at the end of that file (after the one second of silence) and Paste the contents of “Louisiana Waterthrush 2” at the end. The final result is a single file with two segments separated by one second of silence. This silence allows a listener to know that there was a pause in the field between the creation of the first segment and the second segment of the recording. After adding the contents of the second file to the first file, perform a Save As… of “Louisiana Waterthrush 1” and rename this composite file as something like “Louisiana Waterthrush Final” to differentiate it from the two individual source files. Here is our final merged file:

The end result is a single file with two separate segments, each trimmed and with the peak level set to -3 dB. This single new file is now ready to be uploaded to eBird!
Recordings with voice announcements
We encourage recordists to make voice announcements after recording a bird and to include these voice announcements with any recordings that are uploaded. If you do include a voice announcement with a bird recording, simply add it to the end of the recording by following the “Multiple Recordings” guidelines above. There is just one difference in how we handle voice announcements—we only amplify the voice announcements to a peak level of -10 dB (rather than the -3 dB peak for bird sounds). Here is a completed sound file of an Eastern Meadowlark call with a voice announcement at the end:

Now your recording is ready for upload to the Macaulay Library and eBird! Check out our pages on preparing and uploading media for more information.