

Setting up the Sound Devices MixPre-3
The Sound Devices MixPre-3 is a professional quality, durable, and portable field recorder that is very user-friendly. However, the out-of-the-box settings are not ideal for using in the field. We recommend using the following settings before going out to record. (Note: the first generation and the MixPre-3 II share most of their menu structure and options, but there are some differences, noted below.) For a more in-depth list of settings and options, the MixPre-3 user manual can be consulted.
Quick Links
General layout
Setting date and time
Battery saving settings
Setting up for mono
Setting up for stereo
File and folder structure
File name prefix
SD cards
Updating firmware
32-bit recording
USB backup
![]() General layout
General layout
 General layout
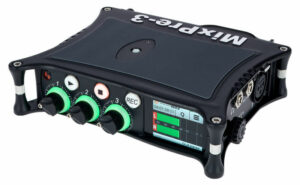
The basic controls of the MixPre-3 are simple:
- The round REC record button starts a recording.
- The square Stop button stops the recording and ends that file.
![]() The three channel knobs control the input level for their respective channels.
The three channel knobs control the input level for their respective channels.- The headphone volume is controlled by a knob on the right side of the recorder; this knob is also used for some menu options that require more precision than the touch screen can offer.
- The setup menus are accessed by pressing the icon with the three horizontal bars on the LCD touchscreen.
The menu and settings are a little more complicated, but they are easy to adjust once you have set up the system for the first time.
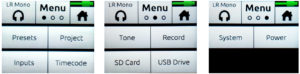
Once in the setup menus, a Menu button appears in the top, center section of the touchscreen. Touching this button will allow you to move between the three Menu screens (represented by the three dots below the word “Menu”).
Setting date and time
From the main menu, and go to the System sub-menu. Tap through to the third page, then choose Date/Time. You can then select either Set Date or Set Time.
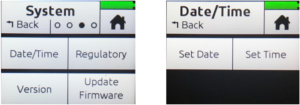
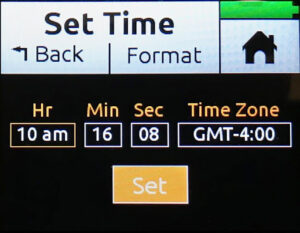 Once in the menu for Date or Time, use the headphone knob on the right side of the recorder to move between the different fields. Push the knob in to select the field you want to edit, and then turn the knob to adjust the value. Once done, tap on the “Set” button on the touch screen.
Battery saving settings
The MixPre-3 uses a lot of battery life, so it is highly recommended to use an external lithium battery pack to power it in the field. Even so, there are several settings that can help save energy.
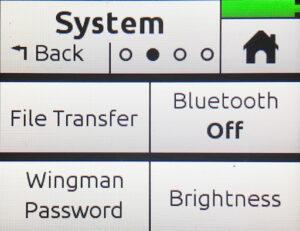 First, adjust the brightness of the channel knobs and the screen. Go into the main menu, click the System sub-menu, go to the second page, and select the Brightness option. You can adjust the brightness for both the LCD (main screen) and LED (channel knob) displays. A setting between 2-4 works for most conditions, although this is ultimately a personal preference. Using higher brightnesses will drain batteries more quickly.
Back on the System sub-menu, click on the Bluetooth option so it shows Off. This may also save battery life. Finally, in the System sub-menu, change the USB-C option to Power Only.
Record set-up
In the main menu, choose the Record option, where you can set file type and other settings. Channel options will be addressed in the next section, but you can start by setting the following:
Sample Rate: 48kHz recommended in most situations); 96kHz can be used if very high frequency sounds are being targeted (this will significantly increase file size.)
Bit Depth: at least 24 bits is recommended. If you are using a recorder in the II series, 32 bits is recommended (see below).
Pre-roll time: this determines how much buffer is being recorded before you press the record button. The more you record, the more you will have to work with, though it can add messiness to your files. 5 seconds is a good option, although you can select more on the II series if you wish.
Rec Trigger: Off; not relevant unless you’re connecting with a camera
Record Bells: Off or On; gives an audible beep through the headphones when you start and stop recording. Can be useful to give you confirmation a recording has begun, but a matter of preference.
Mono-specific set-up
If you are using a single mono microphone, like a shotgun or a mono parabola, follow these instructions for setting up the channels on the MixPre-3. If you are using a stereo microphone or pair of microphones, you can skip to the stereo-specific set-up section.
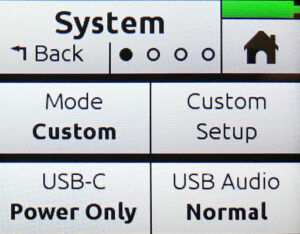 From the Menu screen, select System. In the System submenu, select Mode, and then select Custom from the three choices (Basic, Advanced, and Custom).
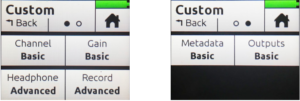
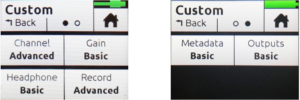
Then choose Custom Setup, where the following settings are recommended:
Channel: Basic
Gain: Basic
Headphone: Advanced
Record: Advanced
Metadata: Basic
Outputs: Basic
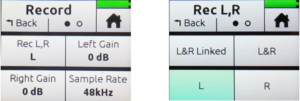
Press the Home button, and then the Menu button. Go to the second page of menu options and select Record, then Rec L,R and select L.
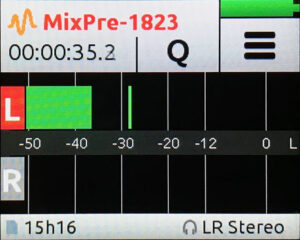
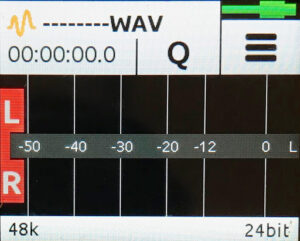
Press the Home button again, and the meter should display the Left channel in red, and the Right channel in gray. The grayed-out Right channel means that the Right channel has been deactivated.
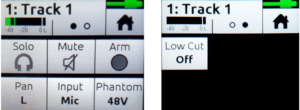
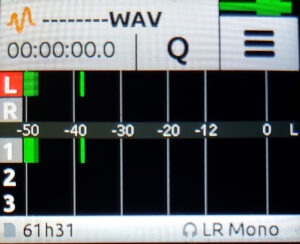
If you touch the meter screen once, it will go to a split view, showing the L and R channels at the top, and the 1, 2, and 3 tracks below. Initially, the 1, 2, and 3 tracks will appear red, meaning they are active, but we want to deactivate them. To deactivate a track, press down on the corresponding control knob. Pressing the “1” knob will display a screen that shows the following buttons: Solo, Mute, Arm, Pan, Input, Phantom, Low Cut.
Press the “Arm” button to change it from red to gray. Then press the “2” knob to display Track 2 options. Important: on Track 2, change Input from Mic to Off. This will prevent this channel from introducing digital noise in case the knob gets turned up. Finally, press the “3” knob and turn off Track 3 in the same way.
For a microphone that requires (or can use) phantom power, press the Phantom button in the Channel 1 menu and change it from Off to 48V. The recorder will then provide power to your microphone.
Returning to the Home screen, all of the channels and tracks visible on the meters should be grayed out except for the L channel, which should be red.
Press the meter screen twice to return to the simplest meter, which just displays L and R.
If you would like to apply a low cut filter to reduce very low frequency sounds, press the Low Cut button on the same screen to change from Off to On.
In summary, the settings visible when you press the “1” knob should be:
Solo = gray
Mute = gray
Arm = gray circle
Pan = L
Input = Mic
Phantom = 48V (or Off, if using a battery in the mic)
Low Cut = On or Off, depending on preference
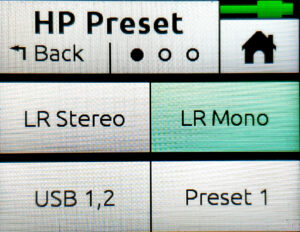 Finally, we need to set up the headphones to send the left channel audio to both ear pieces. To do this, go to Menu, then tap the headphones icon in the upper left corner. Choose LR Mono.
Stereo-specific set-up
If you are using a stereo recording setup, like a stereo microphone or pair of microphones, follow these instructions for setting up the channels on the MixPre-3. If you are using a single mono microphone, like a shotgun or a mono parabola, see the mono-specific set-up section above.
The end result will be that you can set the level using the Channel 1 knob, and the balance between the two channels using the Channel 2 knob.
 From the Menu screen, select the System button. In the System submenu, select the Mode button, and then select Custom from the three choices (Basic, Advanced, and Custom).
In Custom Setup, use the following settings:
Channel: Advanced
Gain: Basic
Headphone: Basic
Record: Advanced
Metadata: Basic
Outputs: Basic
Go back to the main menu, then to Record, Rec L,R, then select L&R Linked.
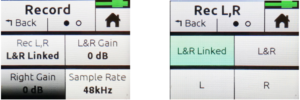
Press the Home button and the meter should display both the left and right channels in red, connected by a red bar. This means that both channels are activated and connected.
If you touch the meter screen once, it will go to a split view, showing the L and R channels at the top, and then 1, 2, and 3 tracks below. Initially, the 1, 2, and 3 tracks will appear red, meaning they are active, but we want to deactivate them. To deactivate a track, press down on the relevant control knob. Pressing the “1” knob will display a screen that shows the following buttons: Solo, Mute, Arm, Pan, Low Cut, and Input on the first screen, and Phantom, Phase, Delay, and Linking on the second screen.
Press the Arm button to change it from red to gray. Then press the “2” knob to disarm Track 2 in the same way (press the Arm button, changing it from red to gray). Finally, press the “3” knob and disarm Track 3. Important: while on the Track 3 menu, change Input from Mic to Off. This will prevent this channel from introducing digital noise in case the knob gets turned up.
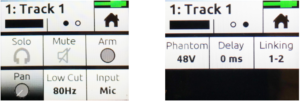
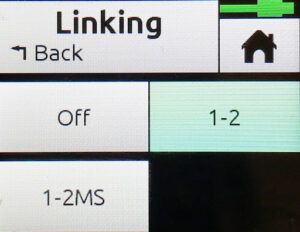
Next, to link Channels 1 and 2 so that you can control the gain with only the Channel 1 knob, go to Linking on the second page of the Channel 1 menu and choose 1-2.
For a microphone that requires (or can use) phantom power, change the Phantom option from Off to 48V in both the Channel 1 and Channel 2 menus and change it. The recorder will then provide power to your microphones.
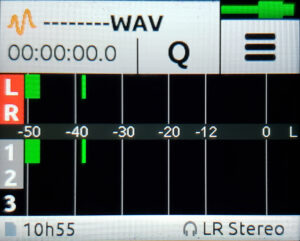 Returning to the Home screen, all of the channels and tracks visible on the meters should be grayed out except for the L and R channels, which should be red. Press the meter screen twice to return to the simplest meter, which just displays L and R.
If you would like to apply a low cut filter to reduce very low frequency sounds, press the Low Cut button on each channel menu to change from Off to On.
In summary, the settings visible when you press the “1” knob should be:
Solo = gray
Mute = gray
Arm = gray circle
Pan = grayed out
Low Cut = Max of 80 Hz, depending on preference
Input = Mic
Phantom = 48V (or Off if using a battery in the mic)
Phase = Normal
Delay = 0 ms
Linking = 1-2
On the “2” knob, everything should be grayed out.
Now you control the input level with the Channel 1 knob and the balance with the Channel 2 knob. Make sure the Channel 2 knob stays in the upright position (“Bal 2:” at the top of the screen will show as “C”) or the channels will be imbalanced.
Presets
The current suite of settings on the recorder can be saved to a preset, which can then be recalled in the future if settings are reset or changed. This is especially useful if you are likely to be switching between two or more different combinations of settings regularly (using a mono microphone and then a stereo setup, for example.) In general, if you use the same type of microphone and do not need to adjust the settings much, presets are not really worth the effort and can be ignored.
To store a preset, assign all the settings the way you want them, then go to the Menu and choose Presets. Choose to save to one of the internal preset slots (1-4) that you wish to assign your current settings, then use the headphone knob to move through the keyboard on the screen and give the preset a name. Finally, tap Ok and the preset will be saved.
To recall a preset, choose Presets, Load Preset, and the list of presets will be displayed. Use the headphone knob to navigate to the one you want, click it, tap Ok, and those settings will be applied.
Note that making a change to settings while a preset is applied does not save the changes to that preset. To do so, you will have to save it and name it all over again for your changes to be reflected the next time that preset is recalled.
Playing files in the field
To play back recorded files, tap the file name in the upper left corner of the screen, then use the headphone knob to scroll through recently recorded files. Press the Play button (leftmost of main buttons) to play this file, and the Stop button to stop it again.
File and folder structure
The default file structure on the SD card is arranged into separate folders by day, resulting in folder names such as “05-15-20”. This is currently the only option, but the date format can be changed by going to Menu, System, Date/Time, Set Date, and choosing Format.
File name prefix
The default file name prefix is “MixPre,” so your files will be called “MixPre-001” and so on, with each file counting up one number, even if a different SD card is used. Currently, there is no option to assign a date or other identifier to the files on the recorder (although this can be achieved with a file renamer if necessary). It is easy to change the file prefix to another alphanumeric sequence (such as your initials). From the main home screen, tap the upper left corner where the current file and timer is displayed. The name of the next file to be recorded will be highlighted. Choose Edit and you have the option to change the prefix under “Name,” the next number in sequence under “Number,” and even the names of the different tracks. Changing the prefix is a good idea as it will make your files more recognizable as your own.
SD cards
High write-speed SD cards are recommended. The MixPre-3 may require formatting a card before using it, and this is recommended for best performance. Make sure your card doesn’t have any data that will be lost before using it with the MixPre for the first time. Go to the menu, choose SD Card, Edit, then Format.
When downloading files, make sure they are in two places before clearing or reformatting the card. If you copy the files to one location and then move them to your second, backup location, the card will then be visibly empty and can be reformatted (or not) without worrying you might have missed some files in your copy.
Updating firmware
Sound Devices releases new firmware for the MixPre series quite frequently, and these updates can include important bug fixes and sometimes even new functionality, so checking for and installing these as they are released is a good idea. Firmware updates can be found here. Download the latest firmware file, open the Zip file, copy the “.prg” file to a MixPre-formatted SD card, then load the card into the recorder. Power the recorder on and navigate to Menu, System, Update Firmware in the main menu. Follow the prompts and the firmware will be installed.
32-bit recording (II series only)
The biggest change in the II series is 32-bit recording, which allows signals that clip (hit 0dB on the meter) to later be normalized down and back into unclipped range, essentially ensuring that recordings will not distort and making the level-setting process much less work. If you have a II series MixPre, it is highly recommended to use this function. It makes the resulting files somewhat larger and may use slightly more battery life, but the benefits more than outweigh the costs. To turn it on, go to Menu, Record, Bit Depth, and choose 32 (float). The recorder will restart to apply this change.
USB backup (II series only)
The MixPre II series introduced a feature called USB Auto-Copy, where an appropriately formatted thumb drive can be inserted into the USB-A port on the recorder and left there during recording. At the end of each recording, the recorder will create a copy of the file onto the USB drive (in addition to the primary file written to the SD card). This provides an additional backup in case the SD cards becomes corrupted or is lost, and it also provides a potentially more convenient way to download a day’s files without having to open the battery compartment and extract the SD card every time.